Monday, 30 April 2012

A Simple Paint Program using HTML5 and JavaScript

A Simple Paint Program using HTML5 and JavaScript


hi friends, 
today we are going to create simple paint application in html file using HTML5 & JavaScript (no JQuery) so let's get started
(note : to run this program you have to use modern web browser that support HTML5 because canvas tag only sported by html5).
First of all open any text editor like Notepad or Notepad++, i'm using Notepad++ and save it to "Paint.html" file name than start writing coding

in first line don't forgot to write "<!DOCTYPE html>" tag that identify version of HTML then start html and other necessary tag like <head>,<title> etc. here i'm create simple CSS property for specific element that we are using in application you can also add another tag for customize application

           After creating CSS write code inside body tab here we create on drop down box for option which tools user want to use see like below image


write code for drop down box


after crating drop down box create canvas that where use paint

if browser is not support html5 then problem are created so solving this problem we need to put some code for use simplification here we providing error message to user and give some like for download modern web browser 

now html code is complete just remaining java script so close all remaining tab like body and html put <script> tag before closing body tag

write java script code inside script tag


first of all in java script we need to add event for window when html content is lode in to browse here we create function and some variable for storing value of canvas and tools

then create another one function inside that called "init()"

here store value of over canvas(class="imageView") into canvaso variable then check validation into that  using JavaScript DOM API for html and create tempers canvas


store value of canvas into Canvas variable and put child node as canvas that we are created and store selected tools value in tool_select variable finally attach event handler to canvas for three event "mousedown","mousemove","mouseup" in single function that called ev_canvas 

write code inside ev_canvas find value of X position and Y position of mouse and also update define function for tools changing in drop down box 

for value changing event in drop down box

then write code for particular tools pencil rectedgel and line

for pencil write below code

for rectangle  write below code


for line write below code


finally call init() function then close scope of fuction and close remaining tag like script body and html


your application is ready to run .........................

Tuesday, 24 April 2012

Create amazing Android iPhone and iPad apps with C# and .NET

Create amazing Android, iPhone and iPad apps with C# and .NET


Create Great Apps Fast

MonoTouch and Mono for Android make it easy for .NET developers to dive right into mobile development.
Overview
When considering how to build Android applications, many people think that Java is the only choice. However, over the past few years, an entire new ecosystem of platforms for building Android applications has emerged. These new solutions include Mono for Android,AppCelerator, PhoneGap, etc., just to name a few.

Each of these platforms has a different feature set and each varies in its ability to write native applications – that is, applications that compile down to native code and that interop fluently with the underlying Java subsystem. For example, some platforms only allow you to build apps in HTML and JavaScript (such as AppCelerator), whereas some are very low-level and only allow C/C++ code. Some platforms (such as Flash) don’t even utilize the native control toolkit.
Mono for Android is unique in that it combines all of the power of Java and adds a number of powerful features of its own, including:
  • Complete Binding for Android Java API – Mono for Android contains bindings for nearly the entire ADK. Additionally, these bindings are strongly-typed, which means that they’re easy to navigate and use, and provide robust compile-time type checking and autocomplete during development. This leads to fewer runtime errors and higher quality applications.
  • Java and C/C++ Interop – Mono for Android provides facilities for directly invoking Java, C, and C++ libraries, giving you the power to use a wide array of 3rd party code that has already been created. This lets you take advantage of existing Android libraries written in Java or C/C++.
  • Modern Language Constructs – Mono for Android applications are written in C#, a modern language that includes significant improvements over Java such as Dynamic Language FeaturesFunctional Constructs such as LambdasLINQ, Parallel Programming features, sophisticated Generics, and more.
  • .NET Base Class Library (BCL) – Mono for Android applications uses the .NET BCL, a massive collection of classes that have comprehensive and streamlined features such as powerful XML, Database, Serialization, IO, String, and Networking support, just to name a few. Additionally, existing C# code can be compiled against Mono for Android for use in your applications, which provides access to thousands upon thousands of libraries that will let you do things that aren’t already covered in the BCL.
  • Modern Integrated Development Environment (IDE) – Mono for Android uses MonoDevelop on Mac OSX, and also MonoDevelop or Visual Studio 2010 on Windows. These are both modern IDE’s that include features such as code auto completion, a sophisticated Project and Solution management system, a comprehensive project template library, integrated source control, and many others.
  • Mobile Cross Platform Support – Mono for Android is a sibling to MonoTouch, which allows C# applications to be written for the Android platform. MonoTouch and Mono for Android allow iOS and Android applications to be written that share common backend application code. Additionally, because both Mono for Android and MonoTouch utilize C# and the .NET BCL, the same application code can be shared with Windows Mobile 7 applications as well! This can significantly reduce both development costs and time to market for mobile developers that target the three most popular mobile platforms.
Because of Mono for Android’s powerful and comprehensive feature set, it fills a void for application developers that want to use a modern language and platform to develop cross-platform mobile applications.
Let’s dig into Mono for Android a bit to examine how it works.

How Does Mono for Android Work?

Mono for Android is a commercial product built on top of Mono, which is an open-source version of the .NET Framework based on the published .NET ECMA standards. Mono has been around nearly as long as the .NET framework itself, and runs on nearly every imaginable platform including Linux, UNIX, FreeBSD, Mac OSX, and others.
Mono for Android was originally created by Novell and released in 2011; however, just after its release, most of the Mono (and Mono for Android) team formed a new company (Xamarin) as part of Novell’s restructuring. Novell then granted Xamarin a perpetual license to all things Mono and handed the Mono for Android reins over to Xamarin, who supports and continues to develop new Mono for Android releases.
Mono for Android allows you to use C# and the .NET Base Class Library (BCL) to write native Android applications. This is accomplished by executing applications in an instance of the Mono runtime VM, which co-exists on devices along with Google’s Dalvik VM. When a Mono for Android application is built, three main steps occur:
  • Resource Generation – As a pre-build step, aresgen.exe is run against a Resources directory in order to generate a Resources.designer.cs file containing Android resource identifiers. These resource identifiers are a key piece of Android applications and are used to locate images, UI files, strings, etc.
  • Compilation – C# code is compiled into a Managed .NET/Mono assembly.
  • Android Wrapper Creation – The mandroid.exe tool is run against the .NET assembly to generate Android-callable wrappers and generate an Android package.d development.


Create Great Apps Fast

MonoTouch and Mono for Android make it easy for .NET developers to dive right into mobile development.


Share Code Between Platforms

Save time by sharing data structures and non-UI code between iOS and Android.

Use Your Existing .NET Skills

Reuse your .NET skills and write code in your mobile apps using C# and familiar libraries.

Powerful and Modern Framework

Write code using a modern, strongly typed, garbage collected framework.


Easy Access To Native APIs

Access to thousands of native iOS and Android APIs.

Target Multiple Devices

Easily write apps that target iPhone, iPad, iPod Touch and Android devices.

Rich IDE Support

Full support for autocomplete in our rich IDE. Or use Visual Studio for Android development.

Tuesday, 17 April 2012

NuGet

NuGet GUI Window

NuGet Overview

NuGet is a Visual Studio extension that makes it easy to add, remove, and update libraries and tools in Visual Studio projects that use the .NET Framework. If you develop a library or tool that you want to share with other developers, you create a NuGet package and store the package in a NuGet repository. If you want to use a library or tool that someone else has developed, you retrieve the package from the repository and install it in your Visual Studio project or solution.
When you install the package, NuGet copies files to your solution and automatically makes whatever changes are needed, such as adding references and changing your app.config or web.config file. If you decide to remove the library, NuGet removes files and reverses whatever changes it made in your project so that no clutter is left.

NuGet Packages

Everything necessary to install a library or tool is bundled into a package (a .nupkg file). A package includes files to copy to your project and a manifest file that describes the contents of the package and what needs to be done to add or remove the library. Packages are bundled into feeds that Visual Studio accesses in order to present lists of available packages. There is an official feed that is the default source for NuGet, and you can contribute to that feed or create your own feeds.

The Manage NuGet Packages Dialog Box

The following illustration shows the Manage NuGet Packages dialog box. Click on the Online tab to see packages available in the official feed.
Manage NuGet Packages dialog

The Package Manager Console Window

The following illustration shows the Package Manager Console window.
Package Manager Console
to download NuGet 1.7 click here

Thursday, 12 April 2012

ASP.NET MVC 3


Introduction 

this is my fist article but after reading this article you are getting what is entity framework 4.1 and why say it's to "code fist" and how it is make easy to do database work in your any .net application here i give you only one asp.net mvc 3 example but you can use that in same in you any .net application (like silverlight, wpf ,asp.net 4 etc)

benefits of mvc 3(here we are see)
1.no need to create database here database are automatable garneted by .net
2.no need to create view(page) for insert update and delete in application
3.mvc 3 is full support for HTML5 CSS3 and JQuery
  and many more

Background 

fist of all before reading this article you have to some basic knowledge of .net architectural, oops and asp.net mvc 3
basic software tool to run this simple application in you pc

  1. visual studio 2010 
  2. Asp.net mvc 3 tools
  3. entity framework 4.1  

Using the code 

here we create one asp.net mvc 3 empty project
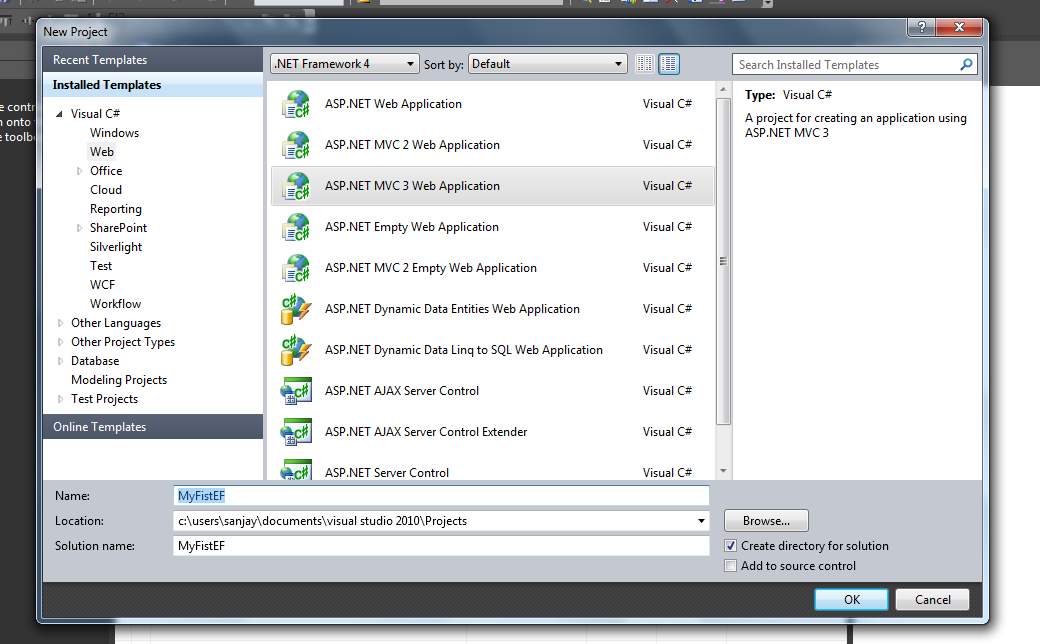
  1. fist start visual studio then select new project and select asp.net mvc 3 application give MyFistEF name to application

press ok that ask you which type of project you want to select empty project and view engine is Razor than press ok  button

then you need to add some class in to your model in you solution explorer right click to "Model" folder and add new class 
here we create  simple example for shop and book one shop have many book create one class "book"

using System;
using System.Linq;
using System.Text;
namespace MyFistEF.Models
{
  public   class Book
    {
        public int BookID { get; set; }
        public string BookName { get; set; }

        public string AuthorNAme { get; set; }
    }
}
same as book class create bookshop class

using System;
using System.Collections.Generic;
using System.Linq;
using System.Web; 
namespace MyFistEF.Models
{

    public class BookShop
    {
        public int BookShopId { get; set; }
        public string ShopName { get; set; }

        public IList<Book> BookList { get; set; }
    }
}


in shop class we take one IList for book that is for one shop have many book when in shop class we take one IList for book that is for one shop have many book

one lass class for DataConext build you project here  when application are run that time using data DataContext  class Entity fingermark automatically greatness database using that "DataContext" remember don't forget to inherit "Dbcontext" class data to over context class that need to  add "System.Data.Entity" namespace

using System;
using System.Collections.Generic;
using System.Linq;
using System.Web;
using System.Data.Entity;
namespace MyFistEF.Models
{

    public class DataContext :DbContext
    {
        public DbSet<Book> Books { get; set; }
        public DbSet<BookShop> Shops { get; set; }

    }
}
 

here Model work is over 
now add new Controllers  right click to "Controllers" and select add => Controller

giver name to this controller to "homeController" then template option select "controller with read/write actions and views, using Entity Framework" that is create view for insert update and list view for selected model class here we select "Book" model class then last select Date context class then press add  
you application is ready to run when application is run the entity framework is create data base and it's table automatically it's also give Pk and Fk  in to table and give relationship also 

Wednesday, 11 April 2012

Razor View Engine

Razor View Engine
Razor is the name of the new view engine in MVC 3. The ASP.NET view engine processes web pages, looking for special elements that contain server-side instructions. As we’ve noted earlier, the standard ASPX view engine relies on the <% and %> elements, which are familiar to all ASP.NET developers. With Razor, the MVC development team has  introduced a new set of syntax elements, centered on the @ symbol. By and large, if you are familiar with the <% %> syntax, you won’t have too many problems with Razor, although there are a few new rules. In this section, the Razor syntax  We aren’t going to supply an exhaustive Razor reference; think of this more as a crash course in the syntax.

see the following code example for Razar view engine 


Razor views have a file extension of .cshtml, as opposed to the .aspx extension used in previous MVC releases and in ASP.NET Web Forms. You can still use the ASPX view engine in an MVC 3 project, but we prefer the Razor engine, and it seems to be a strong area of focus for the Microsoft MVC development team.